Showing posts with label AWS. Show all posts
This code snippet will reduce your manual work to deploy applications. Here I am transferring WAR to Amazon EC2 using Java.

Required Libraries

Find below for highlighted code, Enter local file address, remote file address, file address of private key file, private key file address
import com.jcraft.jsch.*;
import java.awt.*;
import javax.swing.*;
import java.io.*;

public class JTransferFileEC2 {
    public static void main(String[] arg) {
        String localFile = "D:\\demos.war";
        String remoteFile = "/var/lib/tomcat7/webapps/demos1.war";
        
        String user = "ec2-user";
        String host = "enter your ec2 ip address here";
        int port = 22;
        String privateKey = "D:\\sodhanademo1.pem";
        
        FileInputStream fis = null;
        try {

            JSch jsch = new JSch();

            
            jsch.addIdentity(privateKey);
            System.out.println("identity added ");

            Session session = jsch.getSession(user, host, port);
            System.out.println("session created.");

            // disabling StrictHostKeyChecking may help to make connection but
            // makes it insecure
            // see
            // http://stackoverflow.com/questions/30178936/jsch-sftp-security-with-session-setconfigstricthostkeychecking-no
            //
            java.util.Properties config = new java.util.Properties();
            config.put("StrictHostKeyChecking", "no");
            session.setConfig(config);

            
            // username and password will be given via UserInfo interface.
            UserInfo ui = new MyUserInfo();
            session.setUserInfo(ui);
            session.connect();

            boolean ptimestamp = true;

            // exec 'scp -t rfile' remotely
            String command = "scp " + (ptimestamp ? "-p" : "") + " -t " + remoteFile;
            Channel channel = session.openChannel("exec");
            ((ChannelExec) channel).setCommand(command);

            // get I/O streams for remote scp
            OutputStream out = channel.getOutputStream();
            InputStream in = channel.getInputStream();

            channel.connect();

            if (checkAck(in) != 0) {
                System.exit(0);
            }

            File _lfile = new File(localFile);

            if (ptimestamp) {
                command = "T" + (_lfile.lastModified() / 1000) + " 0";
                // The access time should be sent here,
                // but it is not accessible with JavaAPI ;-<
                command += (" " + (_lfile.lastModified() / 1000) + " 0\n");
                out.write(command.getBytes());
                out.flush();
                if (checkAck(in) != 0) {
                    System.exit(0);
                }
            }

            // send "C0644 filesize filename", where filename should not include
            // '/'
            long filesize = _lfile.length();
            command = "C0644 " + filesize + " ";
            if (localFile.lastIndexOf('/') > 0) {
                command += localFile.substring(localFile.lastIndexOf('/') + 1);
            } else {
                command += localFile;
            }
            command += "\n";
            out.write(command.getBytes());
            out.flush();
            if (checkAck(in) != 0) {
                System.exit(0);
            }

            // send a content of lfile
            fis = new FileInputStream(localFile);
            byte[] buf = new byte[1024];
            while (true) {
                int len = fis.read(buf, 0, buf.length);
                if (len <= 0)
                    break;
                out.write(buf, 0, len); // out.flush();
            }
            fis.close();
            fis = null;
            // send '\0'
            buf[0] = 0;
            out.write(buf, 0, 1);
            out.flush();
            if (checkAck(in) != 0) {
                System.exit(0);
            }
            out.close();

            channel.disconnect();
            session.disconnect();

            System.exit(0);
        } catch (Exception e) {
            System.out.println(e);
            e.printStackTrace();
            try {
                if (fis != null)
                    fis.close();
            } catch (Exception ee) {
            }
        }
    }

    static int checkAck(InputStream in) throws IOException {
        int b = in.read();
        // b may be 0 for success,
        // 1 for error,
        // 2 for fatal error,
        // -1
        if (b == 0)
            return b;
        if (b == -1)
            return b;

        if (b == 1 || b == 2) {
            StringBuffer sb = new StringBuffer();
            int c;
            do {
                c = in.read();
                sb.append((char) c);
            } while (c != '\n');
            if (b == 1) { // error
                System.out.print(sb.toString());
            }
            if (b == 2) { // fatal error
                System.out.print(sb.toString());
            }
        }
        return b;
    }

    public static class MyUserInfo implements UserInfo, UIKeyboardInteractive {
        public String getPassword() {
            return passwd;
        }

        public boolean promptYesNo(String str) {
            Object[] options = { "yes", "no" };
            int foo = JOptionPane.showOptionDialog(null, str, "Warning",
                    JOptionPane.DEFAULT_OPTION, JOptionPane.WARNING_MESSAGE,
                    null, options, options[0]);
            return foo == 0;
        }

        String passwd;
        JTextField passwordField = (JTextField) new JPasswordField(20);

        public String getPassphrase() {
            return null;
        }

        public boolean promptPassphrase(String message) {
            return true;
        }

        public boolean promptPassword(String message) {
            Object[] ob = { passwordField };
            int result = JOptionPane.showConfirmDialog(null, ob, message,
                    JOptionPane.OK_CANCEL_OPTION);
            if (result == JOptionPane.OK_OPTION) {
                passwd = passwordField.getText();
                return true;
            } else {
                return false;
            }
        }

        public void showMessage(String message) {
            JOptionPane.showMessageDialog(null, message);
        }

        final GridBagConstraints gbc = new GridBagConstraints(0, 0, 1, 1, 1, 1,
                GridBagConstraints.NORTHWEST, GridBagConstraints.NONE,
                new Insets(0, 0, 0, 0), 0, 0);
        private Container panel;

        public String[] promptKeyboardInteractive(String destination,
                String name, String instruction, String[] prompt, boolean[] echo) {
            panel = new JPanel();
            panel.setLayout(new GridBagLayout());

            gbc.weightx = 1.0;
            gbc.gridwidth = GridBagConstraints.REMAINDER;
            gbc.gridx = 0;
            panel.add(new JLabel(instruction), gbc);
            gbc.gridy++;

            gbc.gridwidth = GridBagConstraints.RELATIVE;

            JTextField[] texts = new JTextField[prompt.length];
            for (int i = 0; i < prompt.length; i++) {
                gbc.fill = GridBagConstraints.NONE;
                gbc.gridx = 0;
                gbc.weightx = 1;
                panel.add(new JLabel(prompt[i]), gbc);

                gbc.gridx = 1;
                gbc.fill = GridBagConstraints.HORIZONTAL;
                gbc.weighty = 1;
                if (echo[i]) {
                    texts[i] = new JTextField(20);
                } else {
                    texts[i] = new JPasswordField(20);
                }
                panel.add(texts[i], gbc);
                gbc.gridy++;
            }

            if (JOptionPane.showConfirmDialog(null, panel, destination + ": "
                    + name, JOptionPane.OK_CANCEL_OPTION,
                    JOptionPane.QUESTION_MESSAGE) == JOptionPane.OK_OPTION) {
                String[] response = new String[prompt.length];
                for (int i = 0; i < prompt.length; i++) {
                    response[i] = texts[i].getText();
                }
                return response;
            } else {
                return null; // cancel
            }
        }
    }
}
Read More
If you have Amazon EC2 linux, then here it is complete tutorial for deploying Java Web Application. First connect to your Amazon EC2 Linux Instance. To run Java web application, you need below things to be installed
  1. JDK
  2. Tomcat
  3. Database (Here I am using MySQL) 

By default you will be connected as ec2-user. Now login as administrator to have complete rights

sudo su

JDK 

Amazon EC2 Linux comes with JDK installation. You don't need to install it. Just check its version
java -version

Tomcat 7

Use below commands for Tomcat 7 management
// Install tomcat 7 with webapps docs-webapp admn-webapps
sudo yum install tomcat7-webapps tomcat7-docs-webapp tomcat7-admin-webapps

// Start tomcat7 server
sudo service tomcat7 start

// Stop tomcat7 server
sudo service tomcat7 stop 

// Restart tomcat7 server
sudo service tomcat7 restart  

// To know running status of tomcat7
sudo service tomcat7 status

// To reload 
sudo service tomcat7 reload

// Add Tomacat 7 service to the autostart
sudo chkconfig tomcat7 on

Database (MySQL)

Find below queries for mysql server management
// To install mysql server
sudo yum install mysql-server

// To start mysql server
sudo service mysqld start

// To stop mysql server
sudo service mysqld stop

// To start server on startup
sudo chkconfig mysqld on

// connect to mysql as root
mysql -u root

// to change root password
mysql> use mysql;
mysql> update user set password=PASSWORD("NEW-ROOT-PASSWORD") where User='root';
mysql> flush privileges;
mysql> quit


// To create database
Create database**********
create schema demos
connect demos
quit

Webapps 

We should deploy WAR file tomcat webapps folder, so now we have to find out it
// find where "webapps" folder located
find / -type d -name 'webapps'

// this is general path for tomcat7 webapps folder
/var/lib/tomcat7/webapps

// change permission for webapps
chmod 777 webapps

// find server.xml
find / -type f -name 'server.xml'

// this is general path for tomcat7 server.xml
/etc/tomcat7/server.xml

// If you want to change server.xml
cd /etc/tomcat7
vi server.xml
//press insert button
//do changes you want
//escape key then :wq

Run Web application on Port 80

Tomcat 7 default port is 8080. HTTP default port is 80, So we have to redirect all traffic from port 80 to 8080. Find below for commands
// It will redirect HTTP request data from port 8080 to 80
sudo /sbin/iptables -t nat -I PREROUTING -p tcp --dport 80 -j REDIRECT --to-port 8080
sudo /sbin/service iptables save

To delete war files or app folders

If you want to remove apps or war files from webapps folder, then use below commands
// for Deleting folders
rm -r mydir
rm -rf mydir

Deploy WAR File

Now we came to final phase of deploying WAR file. Here we have to copy WAR file from local machine to Amazon EC2 Instance. 

Required software

  1. Putty
  2. PuttyGen
  3. FileZilla
While creating amazon EC2, you will get private key file (.pem) to access EC2 instance. Using Putty and this private key file (.pem), you can connect your Amazon EC2 instance. For more information read this article. FileZilla uses .ppk file. So we have to convert .pem file to .ppk file. We can user PuttyGen for converting .pem file to .ppk file

Convert .pem file to .ppk file

  1. Download your .pem from AWS
  2. Open PuTTYgen, select Type of key to generate as: SSH-2 RSA
  3. Click "Load" on the right side about 3/4 down
  4. Set the file type to *.*
  5. Browse to, and Open your .pem file
  6. PuTTY will auto-detect everything it needs, and you just need to click "Save private key" and you can save your ppk key for use with PuTTY

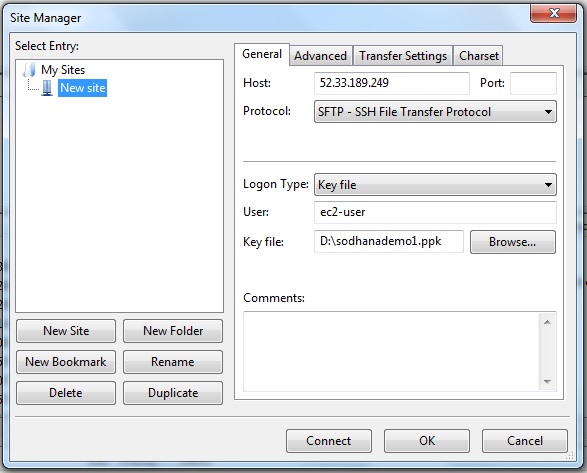
Setup FileZilla

Install FileZilla and Open It. 
Now Click on File > Site Manager 
Add a new site with the following parameters:
Host: Your public dns name of ec2 instance, or the public ip address of the server
Protocol: SFTP
Logon Type: Normal
User: From the docs: "For Amazon Linux, the default user name is ec2-user. For RHEL5, the user name is often root but might be ec2-user. For Ubuntu, the user name is ubuntu. For SUSE Linux, the user name is root. Otherwise, check with your AMI provider."
Now click on "Connect"

Now copy WAR file to webapps folder

Restart tomcat server. Now your web application on the net
Read More
Its easy to create node.js application  with amazon elastic beanstalk.

What is AWS Elastic Beanstalk


AWS Elastic Beanstalk is an even easier way for you to quickly deploy and manage applications in the AWS cloud. You simply upload your application, and Elastic Beanstalk automatically handles the deployment details of capacity provisioning, load balancing, auto-scaling, and application health monitoring. At the same time, with Elastic Beanstalk, you retain full control over the AWS resources powering your application and can access the underlying resources at any time.

1. Select node.js

The getting started page of AWS elastic beanstalk will show you several options (tomcat , php , python, node.js ) . Select application type as node.js from that drop down box and click on "Get Started" button.

Now the AWS elastic beanstalk will create node.js sample application for you. You can replace this application with your own application. Here you can see the process while creating sample node.js application.

After creating that sample application it will show green color mark to specify that the application running in healthy manner.

2. Upload node.js application 

Now you can upload your own node.js application . Here you can see the screenshot

Run Your Application

Now run your application on default domain. Here you can observe the red mark for default domain.


If you want run your application on your own domain then use AWS Route53. Here you can see how to run application on customize domain

THANK YOU

Read More
Its easy to create php application  with amazon elastic beanstalk.

What is AWS Elastic Beanstalk


AWS Elastic Beanstalk is an even easier way for you to quickly deploy and manage applications in the AWS cloud. You simply upload your application, and Elastic Beanstalk automatically handles the deployment details of capacity provisioning, load balancing, auto-scaling, and application health monitoring. At the same time, with Elastic Beanstalk, you retain full control over the AWS resources powering your application and can access the underlying resources at any time.

1. Select PHP

The getting started page of AWS elastic beanstalk will show you several options (tomcat , php , python, node ) . Select application type as PHP from that drop down box and click on "Get Started" button.

Now the AWS elastic beanstalk will create php sample application for you. You can replace this application with your own application. Here you can see the process while creating sample php application.

After creating that sample application it will show green color mark to specify that the application running in healthy manner.

2. Upload PHP application 

Now you can upload your own php application . Here you can see the screenshot

Run Your Application

Now run your application on default domain. Here you can observe the red mark for default domain.


If you want run your application on your own domain then use AWS Route53. Here you can see how to run application on customize domain

THANK YOU

Read More
Its easy to create java web application with TOMCAT server with amazon elastic beanstalk.

What is AWS Elastic Beanstalk


AWS Elastic Beanstalk is an even easier way for you to quickly deploy and manage applications in the AWS cloud. You simply upload your application, and Elastic Beanstalk automatically handles the deployment details of capacity provisioning, load balancing, auto-scaling, and application health monitoring. At the same time, with Elastic Beanstalk, you retain full control over the AWS resources powering your application and can access the underlying resources at any time.

1. Select Tomcat Server

The getting started page of AWS elastic beanstalk will show you several options (tomcat , php , python, node ) . Select application type as TOMCAT from that drop down box and click on "Get Started" button.


Now the AWS elastic beanstalk will create Tomcat sample application for you. You can replace this application with your own application. Here you can see the process while creating sample tomcat web application.

After creating that sample application it will show green color mark to specify that the application running in healthy manner.

2. Upload WAR file 

Now you can upload WAR (Web Archieve ) file for your won java web application. Here you can 

Run Your Application

Now run your application on default domain. Here you can observe the red mark for default domain.


If you want run your application on your own domain then use AWS Route53. Here you can see how to run application on customize domain

THANK YOU

Read More

Blogroll

Popular Posts